What happens when you lock cells in Excel Worksheet?
If you lock a cell and protect the worksheet, then you cannot type data into the cell, modify the data currently in the cell, or change other attributes of the cell (such as cell formatting).
This article describes how to lock individual cells in a Microsoft Excel worksheet. The procedure to use depends on whether you want the majority of the cells on the worksheet to remain locked or unlocked.
If You Want the Majority of Cells Locked To lock the majority of the cells on the worksheet, follow these steps:
1. Select the cells that you want to remain unprotected. To select nonadjacent (noncontiguous) cells, hold down CTRL and click the cells that are to remain unprotected.
2. On the Format menu, click Cells, and then click the Protection tab.
3. Click to clear the Locked check box and click OK.
4. On the Tools menu, point to Protection, and then click Protect Sheet. Type a password if you want one, and then click OK.
If You Want the Majority of Cells Unlocked To leave the majority of the cells on the worksheet unlocked, follow these steps:
1. Select the entire worksheet by clicking the Select All button (the gray rectangle in the upper-left corner of the worksheet where the row 1 and column A headings meet), or by pressing CTRL+A or CTRL+SHIFT+SPACEBAR.
2. On the Format menu, click Cells, and then click the Protection tab. Click to clear the Locked check box and click OK.
3. Select the cells that you want to protect. To select nonadjacent (noncontiguous) cells, hold down CTRL and click the cells that you want to protect.
4. On the Format menu, click Cells, and then click the Protection tab. Click to select the Locked check box, and then click OK.
5. On the Tools menu, point to Protection, and then click Protect Sheet. Type a password, if you want one, and then click OK.
Assuming you have IMAP enabled for your Gmail account, follow these steps to configure Outlook for IMAP access:
1. In the main Outlook menu, click Tools then Account Settings. This opens the Account Settings dialog box.
2. On the E-mail tabbed page, click New. This launches the Add New E-mail Account wizard.
3. On the Choose E-mail Service screen, select Microsoft Exchange, POP3, IMAP, and HTTP, then click Next. The Auto Account Setup screen appears.
4. On the Auto Account Setup screen, set the Manually configure server settings or additional server types checkbox, then click Next. A different Choose E-mail Service screen appears.
5. Select Internet E-mail, then click Next. The Add New E-mail Account screen appears.
Enter your name and your full Gmail e-mail address, including the '@gmail.com.'
For Account Type, select IMAP.
In the Incoming mail server field, enter imap.gmail.com, and in the Outgoing mail server field, enter smtp.gmail.com.
In the Logon Information section, enter your Gmail user name and password.
Set the Remember password checkbox so Outlook can work with your Gmail account without requiring you to enter your logon information constantly.
Click the More Settings button. This opens the Internet E-mail Settings dialog box.
On the Advanced tabbed page, set the Incoming server (IMAP) to 993.
For the Use the following type of encrypted connection, select SSL.
Set the Outgoing server (SMTP) to 587.
For the Use the following type of encrypted connection, select TLS.
Click OK to close the Internet E-mail Settings dialog box.
Click Next, then Finish, then Close to complete the process.
Once you complete all the steps successfully, Outlook connects to your Gmail account and downloads messages. You will find a new set of folders that corresponds to your Gmail account in the Navigation pane.
Configuring Outlook 2003 or XP for Gmail IMAP Access
If you are not using Outlook 2007, follow these steps to configure Outlook for IMAP access to your Gmail account:
In the Outlook main menu, click Tools, then E-mail Accounts. This launches the E-mail Accounts wizard.
Select Add a new e-mail account, then click Next.
Select IMAP, then click Next.
Enter your name and your full Gmail e-mail address, including the '@gmail.com.'
For Account Type, select IMAP.
In the Incoming mail server field, enter imap.gmail.com, and in the Outgoing mail server field, enter smtp.gmail.com.
In the Logon Information section, enter your Gmail user name and password.
Set the Remember password checkbox so Outlook can work with your Gmail account without requiring you to enter your logon information constantly.
Click the More Settings button. This opens the Internet E-mail Settings dialog box.
On the Advanced tabbed page, set the Incoming server (IMAP) to 993.
For the Use the following type of encrypted connection, select SSL.
Set the Outgoing server (SMTP) to 587.
For the Use the following type of encrypted connection, select TLS.
Click OK to close the Internet E-mail Settings dialog box.
Click Next, then Finish, then Close to complete the process.
Once you complete all the steps successfully, Outlook connects to your Gmail account and downloads messages. You will find a new set of folders that corresponds to your Gmail account in the Navigation pane.
I have faced lot of issues while configuring this one!
Let's see how to do this...
Ready to configure Outlook for Gmail POP3 access?
This page includes step-by-step instructions for creating a Gmail Outlook connection (Outlook 2003 > 2007) using the POP3 mail protocol.
One of the really nice things about Outlook 2007 is the way it can automatically configure email accounts at many of the major services.
Gmail is one of those services.
Compare the instructions for automatically configuring a Gmail account in Outlook 2007 to those further down the page for earlier versions. Nine steps instead of 19. That's a major reduction in the work required to configure Outlook with Gmail.
Configuring Outlook 2007 for Gmail POP3 Access
If you are using Outlook 2007, follow these steps to configure Outlook for Gmail POP3 account use:
1. In the Outlook main menu, click Tools, then Account Settings. This opens the Account Settings dialog box.
2. Click New to launch the Add New E-mail Account wizard.
3. On the Choose E-mail Service screen, select Microsoft Exchange, POP3, IMAP, or HTTP, then click Next.
Enter your Gmail account information here for Outlook 2007.
4. On the Auto Account Setup screen, enter your name (as you want it to appear in the From field of messages) into the Your Name field.
5. Enter your full Gmail email address, which is your username followed by "@gmail.com", in the E-mail Address field.
6. Enter your Gmail password in the Password field.
7. Enter your Gmail password again in the Retype Password field, then click Next.
8. Outlook connects to the Gmail servers, and assuming you entered your account information correctly, after a moment it displays the Congratulations! screen.
9. Click Finish. Your Gmail account is configured.
That's the last step in the procedure to configure Outlook for Gmail. Now you can use the CTRL-1 keyboard shortcut to go to the Mail view.
Next press F9 to send and receive all mail. This downloads messages from Gmail. Seeing them in the Inbox will show that you were able to successfully configure Gmail as an Outlook email account.
Configuring Outlook 2003 or XP for Gmail POP3 Access
If you are not using Outlook 2007, follow these steps to configure Gmail and Outlook account use:
1. In the Outlook main menu, click Tools, then E-mail Accounts. This launches the E-mail Accounts wizard.
2. Select Add a new e-mail account, then click Next.
3. Select POP3, then click Next.
Enter your Gmail account information here for Outlook 2003.
4. Enter your name (as you want it to appear in the From field of messages) into the Your Name field.
5. Enter your full Gmail email address, which is your username followed by "@gmail.com", in the E-mail Address field.
6. Enter your Gmail username in the User Name field.
7. Enter your Gmail password in the Password field.
8. Enter "pop.gmail.com" in the Incoming mail server (POP3) field.
9. Enter "smtp.gmail.com" in the Outgoing mail server (SMTP) field.
10. Click More Settings to open the Internet E-mail Settings dialog box.
11. Click the Outgoing Server tab.
12. Set the My outgoing server requires authentication check box.
13. Select Use same settings as my incoming mail server.
14. Click the Advanced tab.
15. Under Incoming server (POP3), set the This server requires an encrypted connection (SSL) check box.
16. Under Outgoing server (SMTP), set the This server requires an encrypted connection (SSL) check box.
17. Change the number in the Outgoing server (SMTP) field to 465, then click OK.
18. Click Test Account Settings. After a moment you should see a message that says all tests were completed successfully. If not, go back to the start of this procedure and check your work.
19. Once you see the success message, click Next then Finish.
That's the last step in the procedure to configure Outlook for Gmail. Now you can use the CTRL-1 keyboard shortcut to go to the Mail view.
Next press F9 to send and receive all mail. This downloads messages from Gmail. Seeing them in the Inbox will show that you were able to successfully configure Gmail as an Outlook email account.
You can add and display a second time zone in Outlook, which can be useful when you are scheduling meetings or conference calls with people who are working in other time zones.
When you add a second time zone, the current time in the primary time zone is highlighted with a color gradient to make it easier to see.
If two time zones are shown, the meeting organizer's time zone is used as the reference point. If you organize a meeting and display free/busy time for invitees from other time zones, their busy times are adjusted so that they are displayed correctly in your time zone.
The second time zone is visible only when you view the calendar in day or week view.
The start and end times for items in the Outlook Calendar are stored in the Coordinated Universal Time (UTC) format. UTC is the international time standard. It is similar to Greenwich Mean Time (GMT), except that UTC observes no daylight saving time (DST) and is based on a 24-hour clock. Zero (0) hours UTC is midnight GMT. The local 24-hour time convention is converted to UTC by adding or subtracting hours based on location in relation to the prime meridian, as well as local daylight saving time considerations.
If you are in one time zone, and you send a meeting request to an attendee in a different time zone, the meeting item is displayed at the respective local times on each person's calendar, but stored as the same absolute time in UTC.
For example, if a meeting organizer in the Pacific Time zone in the United States sends out a meeting request for a meeting that starts at 2:00 P.M. Pacific Time to an attendee in the Mountain Time zone, the attendee will see the meeting as starting at 3:00 P.M. Mountain Time. In both cases, the meeting is stored on the servers as starting at the same UTC time (10:00 P.M.).
Note: With respect to time zones, appointments, meeting items, and all-day events are all handled in the same way.
Add a second time zone
Outlook can display two separate time zones in the Calendar. The two time zones can be, for example, your local time zone and the time zone of a city that you often travel to. When you are staying in the other city, you might want to view your Calendar items in relation to the time zone for that city. To display a second time zone in your Outlook calendar, select the Show an additional time zone check box in the Time Zone dialog box. The second time zone is used only to show a second time bar in Calendar view, and does not affect the way in which Calendar items are stored or displayed.
1. On the Tools menu, click Options.
2. Click Calendar Options.
3. Click Time Zone.
4. Select the Show an additional time zone check box.
5. In the Label box, type a name for the additional time zone.
6. In the Time zone list, click the time zone that you want to add.
7. If you want your computer clock to automatically adjust for daylight saving time changes, select the Adjust for daylight saving time check box.
This option is available only in time zones that use daylight saving time (DST).
Tip: You can quickly switch from your current time zone to the other time zone by clicking Swap Time Zones. This change affects all time displays in Outlook and in all other Microsoft Windows-based programs.
Remove a time zone
1. On the Tools menu, click Options.
2. Click Calendar Options.
3. Click Time Zone.
4. Clear the Show an additional time zone check box.
This guide works 100% for Vista & Windows 7 unlike most of the guides out there. I have seen many sites/blogs that have “Install Vista from USB guide” but either with incomplete steps or not working guide. I have also seen some guides that don’t’ use proper commands in this guide. After spending many hours I have come up with this 100% working guide.
I just did this method on one of my friends machine and installed the new Windows 7 BETA. The main advantage is that by using USB drive you will be able to install Windows 7/Vista in just 15 minutes. You can also use this bootable USB drive on friend’s computer who doesn’t have a DVD optical drive.
The method is very simple and you can use without any hassles. Needless to say that your motherboard should support USB Boot feature to make use of the bootable USB drive.
Requirements:
*USB Flash Drive (Minimum 4GB)
*Windows 7 or Vista installation files.
Follow the below steps to create bootable Windows 7/Vista USB drive using which you can install Windows 7/Vista easily.
1. Plug-in your USB flash drive to USB port and move all the contents from USB drive to a safe location on your system.
2. Open Command Prompt with admin rights. Use any of the below methods to open Command Prompt with admin rights.
*Type cmd in Start menu search box and hit Ctrl+ Shift+ Enter.
Or
*Go to Start menu > All programs > Accessories, right click on Command Prompt and select Run as administrator.
3. You need to know about the USB drive a little bit. Type in the following commands in the command prompt:
First type DISKPART and hit enter to see the below message.
Next type LIST DISK command and note down the Disk number (ex: Disk 1) of your USB flash drive. In the below screenshot my Flash Drive Disk no is Disk 1.
4. Next type all the below commands one by one. Here I assume that your disk drive no is “Disk 1”.If you have Disk 2 as your USB flash drive then use Disk 2.Refer the above step to confirm it.
So below are the commands you need to type and execute one by one:
SELECT DISK 1
CLEAN
CREATE PARTITION PRIMARY
SELECT PARTITION 1
ACTIVE
FORMAT FS=NTFS
(Format process may take few seconds)
ASSIGN
EXIT
Don’t close the command prompt as we need to execute one more command at the next step. Just minimize it.
5. Next insert your Windows7/Vista DVD into the optical drive and check the drive letter of the DVD drive. In this guide I will assume that your DVD drive letter is “D” and USB drive letter is “H” (open my computer to know about it).
6. Maximize the minimized Command Prompt in the 4th step.Type the following command now:
D: CD BOOT and hit enter.Where “D” is your DVD drive letter.
CD BOOT and hit enter to see the below message.
7. Type another command given below to update the USB drive with BOOTMGR compatible code.
BOOTSECT.EXE /NT60 H:
Where “H” is your USB drive letter. Once you enter the above command you will see the below message.
8. Copy your Windows 7/Vista DVD contents to the USB flash drive.
9. Your USB drive is ready to boot and install Windows 7/Vista. Only thing you need to change the boot priority at the BIOS to USB from the HDD or CD ROM drive. I won’t explain it as it’s just the matter the changing the boot priority or enabling the USB boot option in the BIOS.
Note: If you are not able to boot after following this guide means you haven’t set the BIOS priority to USB. If you got any problem in following this guide feel free to ask questions by leaving comment.
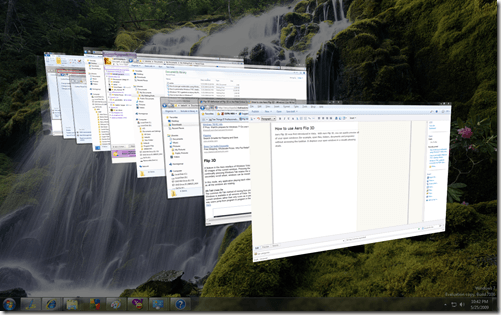
With Aero Flip 3D, you can quickly preview all of your open windows
(for example, open files, folders, documents and programs) without accessing the taskbar. It displays your open windows in a visually pleasing stack.
To use Flip 3D, click and hold the Windows button together with the Tab key.
As you hold the windows button press the tab key to rotate the stack. This will move the windows in a queue so you can see all of your windows in sequence. Once you see the window that you want to view, release the windows button. The window when you release the windows button will be the active window.
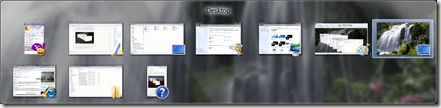
Alt-Tab on the other hand will show the opened windows too, but in a different visual presentation. Instead of a 3D stack, it displays the each of the windows’ thumbnails. On Windows XP, Alt-Tab displays the icons of the programs instead of thumbnails. You can switch between windows by continually pressing Tab while holding Alt.
You can also move around by using the arrow keys instead of the Tab key.
Note:Flip 3D is part of the Aero experience. If your computer does not support Aero, or if you are using a theme other than a Windows 7 Aero theme, you can view the open programs and windows on your computer by pressing Alt+Tab.
If you find the traditional Alt-Tab method to be boring, the Flip 3D method is a good alternative. The only downside is that you need to have a hardware that supports Aero.
If you have recently installed Windows 7 beta on your Vista machine like me, then you may be wondering what is the easy way to change the boot order between Windows 7 and Vista without manually changing any settings under boot.ini or any other file.
Here is a way to change the default OS to boot using the Advanced System Properties under Vista.
So how to change the default OS to boot from Windows 7 to Vista?
Go to
Control Panel Home (Start -> Control Panel) -> System and Maintenance -> System.
On the left side pane, under the Tasks, Click Advanced System Settings.
Click Settings under Startup and Recovery.
Under System startup, you can change the Default operating system between Windows 7 and Vista. If you have installed any other OS, you can change between those settings as well.
Click OK and the next time you start your computer, the boot order should have changed. You can also change the time duration for which it shows to change the booting OS.
PLEASE NOTE: If you want to change the boot sequence on your MAC NoteBook ! In System Preferences > Startup Disk you should be able to choose Mac OS X as the default system in which you wish to boot.