Ads

HTTPS - HyperText Transfer Protocol over SSL (Secure Socket Layer)

HTTPS stands for HyperText Transfer Protocol over SSL (Secure Socket Layer). 

It is a TCP/IP protocol used by Web servers to transfer and display Web content securely. The data transferred is encrypted so that it cannot be read by anyone except the recipient.
HTTPS is used by any Web site that is collecting sensitive customer data such as banking information or purchasing information. 

If you are making a transaction online, you should make sure that it is done over HTTPS so that the data remains secure.
You can tell when a page is using HTTPS in two ways:
  1. There will be a lock icon in the browser window pane (usually at the bottom).
  2. The URL will say "https://" 

There are two primary differences between an HTTPS and an HTTP connection work:
  • HTTPS connects on port 443, while HTTP is on port 80
  • HTTPS encrypts the data sent and received with SSL, while HTTP sends it all as plain text
Most Web customers know that they should look for the https in the URL and the lock icon in their browser when they are making a transaction. So if your storefront is not using HTTPS, you will lose customers. But even still, it is common to find Web sites that collect money including credit card data over a plain HTTP connection. 

This is very bad!
 
HTTP sends the data collected over the Internet in plain text. This means that if you have a form asking for a credit card number, that credit card number can be intercepted by anyone with a packet sniffer. Since there are many free sniffer software tools, this could be anyone at all. By collecting credit card information over an HTTP (not HTTPS) connection, you are broadcasting that credit card information to the world. And the only way your customer will learn it was stolen is when it's maxed out by a thief.

There are only a couple things you need in order to host secure pages on your Web site:
  • A Web server such as Apache with mod_ssl that supports SSL encryption
  • A Unique IP address - this is what the certificate providers use to validate the secure certificate
  • An SSL Certificate from an SSL certificate provider

Source
 

Google Website Optimizer

Google Website Optimizer, Google’s free website testing and optimization tool, allows you to increase the value of your existing websites and traffic without spending a cent. Using Website Optimizer to test and optimize site content and design, you can quickly and easily increase revenue and ROI whether you’re new to marketing or an expert.


How it works?

1. Pick a page you want to improve
Look at your page and pick something you'd like to try changing.
Maybe it's a headline or a description. It can be anything.

2. Create your experiment
Click + Create a new experiment below.

Choose the test type that makes sense for you.
Website Optimizer will guide you through each step of creating your experiment.

3. Need help?
For each step, you'll find instructions and tips on the right-hand side of the page.
You also have a Beginner's Guide.


Source

Recovering root password under Linux with single user mode


It happens sometime that you can’t remember root password. On Linux, recovering root password can be done by booting Linux under a specific mode: single user mode.
 
This tutorial will show how to boot Linux in single user mode when using GRUB
During normal usage, a Linux OS runs under runlevels between 2 and 5 which corresponds to various multi-user modes. Booting Linux under runlevel 1 will allow one to enter into a specific mode, single user mode. Under such a level, you directly get a root prompt. From there, changing root password is a piece of cake.

 
Some Linux distribution, such as Ubuntu for instance, offer a specific boot menu entry where it is stated “Recovery Mode” or “Single-User Mode“. If this is your case, selecting this menu entry will boot your machine into single user mode, you can carry on with the next part. If not, you might want to read this part.

 
Using GRUB, you can manually edit the proposed menu entry at boot time. To do so, when GRUB is presenting the menu list (you might need to press ESC first), follow those instructions:

 
- use the arrows to select the boot entry you want to modify.
- press e to edit the entry
- use the arrows to go to kernel line
- press e to edit this entry
- at the end of the line add the word: single
- press ESC to go back to the parent menu
- press b to boot this kernel

 
The kernel should be booting as usual (except for the graphical splash screen you might be used to), and you will finally get a root prompt (sh#).
Here we are, we have gained root access to the filesystem, let’s finally change the password.

 
As root, changing password does not ask for your old password, therefore running the command:
# passwd

 
will prompt you for your new password and will ask you to confirm it to make sure there is no typo.

 
That’s it, you can now reboot your box and gain root access again.


Source

How To Use Comments To Their Full Potential In Microsoft Word


Though Microsoft Word can sometimes feel like a big clunky program with too many bells and whistles, there are still some powerful time saving tools under its hood that you should know about. One of them is the Comments tool, which can be used sort of like little yellow sticky notes as you write, revise, and edit your research paper, manuscript, business report, or your next great novel.

Comments in Word can serve many purposes, but they work like writing comments in the margins of a paper document. But of course, using Comments in Word, like other digital technology, provides a lot more than putting pen to paper. You can include external links to web resources, internal links to different parts of a document, and set up a pre-addressed email link for your readers. You can also send your Word file to someone or a group of people who in turn can add comments to your document.

Adding Comments In Word 2011

In Microsoft Word 2007-2011, you can add comments (when you’re writing in the Print Layout or Web Layout views) by first selecting one or more words in your document, and then clicking on Insert > New Comment in the menu bar. Note, I’m using Word 2011 for Mac for this tutorial, but the Comment tool and features are similar for the PC version of Word as well.


You can of course access this tool in Word’s Toolbar, or what is called the Ribbon of Word 2010 or Mac 2011 edition, to create a new note using one single click. Or better yet, create a keyboard shortcut for the New Comment menu item (here’s how for Mac users).


When you add a note, you can write as much as you like in it. Your notes will appear as “balloons” on the side of the page where you selected to add the comment. All comments must be attached to piece of selected text. Comments are useful in the writing process for making notes to yourself, especially when you’re in the flow of writing and you don’t want to stop and check a fact or a resource. You can make a note to do it later.


You or another reader of your document could use Comments to ask questions, make suggested changes, or make references to other sources in your document. The comments you add don’t show up when you print your document.

When your balloon comments get too distracting or take up too much precious space on the screen, you can simply click View > Markup to hide them. Do the same to bring them back. You can delete comments one at a time by clicking the “x” button in the upper-right of the Comment’s title bar.


Mobile phone locked OR Not able to unlock mobile phone


When you place a new or a existing SIM card from another phone provider into a different cell phone, it asks for a Security Code and you don't have it with you. This means that a mobile phone is locked to the original mobile phone provider.

You need to contact this mobile provider to ask for the unlock code (Security Code) for this phone.
For this you need to provide proof of ownership etc.

Following are the possible action items you may do, when you come aross the above situation:

1) Get security code/restriction code to unlock the cell phone from the current cell phone service provider.

2) If your phone provider does not help you then this WEB site it provides security codes for a small price.
http://www.mobileunlockstore.com/?gclid=CKDb2_y2558CFSlJagodxBkDHw

3) Try this WEB site also - UnlockFree http://www.unlock-free.com

4) You can also try this WEB site : http://www.mobileunlockguide.com/mobile-phone/

5) For Nokia phone - try this WEB site too : www.unlock-free.com/nokia-master

6)The IMEI number is unique for each mobile phone. The number is printed on the label under the battery.
You can also get the IMEI number by entering this on your phone
*#06# It will then display your IMEI number and you may also get a unique global serial number. Your IMEI number should be 15 digits.

Also read post on PUK information


Outlook 2007: How To Use Voting Buttons in a Message


You can use the Voting Buttons to get responses from a group of colleagues to see what the majority of them are leaning towards. This comes in handy when getting feedback for a meeting date and location or for figuring out where everyone is going to meet after work.

Outlook tallies the votes for you so that they can easily be assessed.


To Insert Voting Buttons into your Message:

1. Create your New Message.

2. Select the Options tab.

3. Select Use Voting Buttons.

4. Choose the voting buttons you wish to use from the four options provided (Approve; Reject, Yes; No, Yes; No; Maybe, or Custom).


5. Make sure your message is the way you want it, including the question or statement that is to be voted on. Make sure you have included the proper recipients for the email message.

6. Click Send.


The recipients of your message will notice a highlighted line of text (vote by clicking Vote in the Respond group above) showing up above the From line in the email. By clicking Vote, they will be shown the voting options to select from.


After they select the desired voting option, a confirmation prompt will appear showing their selection and giving them the choice of sending the response or editing the response before sending.


Getting a Tally of the Votes:

You will receive the replies to your message with the selected voting option in the subject line. You could tally the votes yourself, however if you sent the message out to a large number of recipients, this could be rather time consuming. A better method is to let Outlook tally the votes for you.

1. Go to your Sent Items.

2. Open the message that had the voting buttons.

3. Go to the Ribbon.

4. In the Show section, select Tracking.

You will see the reply totals followed by a list of the individual votes.


Source

How to quickly and easily add a live bookmark/RSS feeds

How to quickly and easily add a live bookmark/RSS feed to Internet Explorer 7 or 8

Both Internet Explorer 7 and 8 fully support live bookmarks/RSS feeds. IE7 and IE8 also support Microsoft's 'Common Feed List', but more on that later. When you visit a site with an RSS feed in Internet Explorer 7/8, the RSS feed icon becomes active. This icon is circled red in the picture below:-


Click on the icon shown above and Internet Explorer will take you to a screen like the one below:-


Notice in the above picture, Internet Explorer says this feed "can be viewed in Internet Explorer and other programs". Here is the really cool part, any feed you add in Internet Explorer will be available in any other program that supports Microsoft's 'Common Feed List'.

Currently this includes Microsoft Outlook and the RSS reader in the Vista sidebar. Eventually most RSS aware Windows programs will support Common Feed List.
Getting back to the tutorial, to add this RSS feed to Internet Explorer and the Common Feed List, click on "Subscribe to this feed" as circled in the picture above.

The following window will then appear:-


Click on "Subscribe" as circled in the picture above to confirm your subscription. The window will close and you will be taken to the page below:-


You can now click on "View my feeds" (as shown above) to see a list of all the feeds you are subscribed to. You can access your feeds at any time by clicking on the favorites center (the small star icon in the top left hand corner
of the IE window, or press the keys ALT and C together) and then choosing "Feeds".

The picture below shows the favorites center open on the feeds tab.


Want to learn how to do it for Firefox ? Here is the link !

Source

Recover MySQL root Password

You can recover MySQL database server password with following five easy steps.

Step # 1: Stop the MySQL server process.

Step # 2: Start the MySQL (mysqld) server/daemon process with the --skip-grant-tables option so that it will not prompt for password.

Step # 3: Connect to mysql server as the root user.

Step # 4: Setup new mysql root account password i.e. reset mysql password.

Step # 5: Exit and restart the MySQL server.

Here are commands you need to type for each step (login as the root user):

Step # 1 : Stop mysql service

# /etc/init.d/mysql stop
Output:

Stopping MySQL database server: mysqld.

Step # 2: Start to MySQL server w/o password:

# mysqld_safe --skip-grant-tables &
Output:

[1] 5988
Starting mysqld daemon with databases from /var/lib/mysql
mysqld_safe[6025]: started

Step # 3: Connect to mysql server using mysql client:

# mysql -u root

Output:

Welcome to the MySQL monitor. Commands end with ; or \g.
Your MySQL connection id is 1 to server version: 4.1.15-Debian_1-log

Type 'help;' or '\h' for help. Type '\c' to clear the buffer.

mysql>

Step # 4: Setup new MySQL root user password

mysql> use mysql;
mysql> update user set password=PASSWORD("NEW-ROOT-PASSWORD") where User='root';
mysql> flush privileges;
mysql> quit

Step # 5: Stop MySQL Server:

# /etc/init.d/mysql stop

Output:

Stopping MySQL database server: mysqld
STOPPING server from pid file /var/run/mysqld/mysqld.pid
mysqld_safe[6186]: ended

mysqld_safe --skip-grant-tables

Step # 6: Start MySQL server and test it

# /etc/init.d/mysql start
# mysql -u root -p


Source

ActivePERL - PERL for Windows - using perl


PERL comes pre-installed on many operating systems, like Linux for example.
For those of us running a version of
Windows however, we must download and install some sort of program that allows us to access PERL scripts from DOS. There are many PERL compilations available for your machine. A simple Google search yields several million results.

ActivePERL is the simplest of installers available and it is also free to download. Download the program, follow the onscreen installation guide, and you should have an active installation of PERL ready to go.

Download ActivePERL link

To test the installation, make sure the program has fully completed installation and then run through the following:

1. Click on Start, go to Run.
2. Please enter 'Command' or 'cmd' into the display box to open up the command prompt.
3. At the command prompt type 'perl -v'

You should get some documentation about Larry Wall 1987-200X, and that means you are officially done installing

PERL and ready to start creating some PERL scripts.

PERL - Testing...Testing Script

Just to be sure everything is running correctly. Open up notepad or your preferred simple text editor and let's make a beginning script. We'll have our script print to the command prompt with the print function just as we would if we were printing text to our web browser.

#! usr/bin/perl
print "Hello PERL!";

Copy the two lines above and save them in a directory that you are capable of accessing through DOS with the name as testing.pl

For eg:
When you launch command prompt you get-->
C:\Documents and Settings\pradeep


Create a new directory named perl in it.
Locate that directory (perl) in your DOS prompt and simply type the name of your PERL script into the command
prompt to execute your script.

C:\Documents and Settings\pradeep\perl> testing.pl

Check that you get an output in the command prompt as: Hello PERL!


Teach yourself Perl in 21 Days !
- David Till (pdf file)

To find the kernel version and memory details of LINUX / SOLARIS Operating System


In SOLARIS, uname -r will give you the solaris release level.
some other useful options with uname are


uname -s [Operating system]
SunOS


uname -r [Release version]
5.8

For example if output is:
2.6.22-14-generic

then it denotes:
* 2 : Kernel version
* 6 : The major revision of the kernel
* 22 : The minor revision of the kernel
* 14 : Immediate fixing / bug fixing for critical error
* generic : Distribution specific sting. For example, Redhat appends string such as EL5 to indicate RHEL 5 kernel.


uname -v
Generic_117350-27[OS version]


uname -a
SunOS hostname 5.8 Generic_117350-27 sun4u sparc
The last two words describes h/w name and processor respctl[equivalent to -m and -p),


$ cat /etc/redhat-release
Red Hat Enterprise Linux Server release 5 (Tikanga)
this command return the Centos version


To find the Memory details:

dmesg | grep ^Memory:

Output: Memory: 1734144k/1792092k available (2512k kernel code, 49156k reserved, 1396k data, 184k init)

The second value is the physical RAM size. It'll also tell you what other junk is subtracted from that to give you what you get with "free"..

Source


Find Java version Internet Explorer or Firefox is using


METHOD 1 : Java command using command prompt

In Windows, open a DOS prompt (a.k.a command window) and enter the following command

java -version

The output will look something like:

java version "1.6.0_17" Java(TM) SE Runtime Environment (build 1.6.0_17-b04) Java HotSpot(TM) Client VM (build 14.3-b01, mixed mode, sharing)

You can also use the command "java -fullversion" and produce output such as:

java full version "1.6.0_17-b04"

On a computer without any version of Java from Sun Microsystems installed, this results in an error message:

'java' is not recognized as an internal or external command, operable program or batch file.

A computer with only Microsoft's ancient version of Java installed, also produces the above error.

On a Windows machine with multiple versions of Java, according to Sun, this command returns the default JVM.


METHOD 2 : Firefox Options

(1) Mozilla has a plugin check (shown below) that seems to detect Java correctly and report on whether its old or not. See a larger screen shot in this window or a new window.


(2) In Firefox version 3, do Tools -> Options -> Main tab -> Manage Add-ons button -> Plug-ins tab.
The screen shot below shows this from Firefox 3.08 on a Windows XP machine.

(3) In Firefox 3, go to the address bar and enter:

about:plugins

If Java is installed there will be multiple Java entries. In Firefox 3 (at least on Windows XP) they are labeled "Java(TM) Platform SE x Ux" where the Xs represent version numbers. Back with Firefox 2 they were labeled either "Java (TM) Platform" or "Java Plug-in" (last verified with v 2.0.0.12).

On a Windows XP machine with Java version 1.6.0_03 installed, there were seven Java entries, all labelled "Java(TM) Platform SE 6 U3" which translates to Version 6, Update 3.

Back with version 1 of Firefox, the many Java entries showed different versions of Java. For more on how this used to work, see Multi-Version Support from Sun.


METHOD 3 : Internet Explorer Options

Advanced Options Tab

In Internet Explorer 6 and 7 do: Tools => Internet Options => Advanced tab and scroll down to about the middle of the options list. If a version of Java from Sun is installed, there will be a section in this list called "Java (Sun)". If Microsoft's Java is installed, there will be a section in this list called "Microsoft VM". If you see both, as the screen shot below (IE7 on Windows XP SP3) illustrates, then IE is using the one that is checked.


METHOD 4 : System Information

In some flavors of Windows, the System Information utility includes information about Internet Explorer. Among the data displayed is information on the Java Virtual Machine.

In Windows 2000 you run the System Information utility with:
Start -> Programs -> Accessories -> System Tools -> System Information

Double Click on Internet Explorer in the left hand column, then click on Summary. The Java VM version is displayed. It is similar to the output from the jview command, but not exactly the same. On one computer jview displayed 5.00.3809 while the System Information utility displayed 5.0.3809.0.

The path to the System Information utility is the same in Windows XP as in Windows 2000. However, XP does not display Java version information (at least XP Home Edition SP1 does not).

In Windows 98SE, the path to the System Information utility is also the same as with Windows 2000. I ran it on two Windows 98SE machines. With a recent version of IE5, System Information included Internet Explorer information. With an old version of IE (5.00.2614.3500) it did not.


Source


How to count the number of worksheets used in an MS Excel file


Assuming I have a number of workbooks with a large number of worksheets filled out (not by me) in each workbook. Do you know how to count the number of worksheets used ?

Well you wouldn't be interested in manually counting by clicking each worksheet ?
Yes there is a way! A much easier than using the VB code;

Here we go;
We use Excel in built formula:

=COUNTA('*'!A1)+1

... where assuming A1 in each sheet is non-blank.

Example:

1. Suppose I have an xls file with 100 sheets:
2. I choose cell B2 and place my formula in it.


3. Press the followin gkeys: Ctrl+Shift+Enter

4. You get the answer as 100 in the cell B2

Check spellings on Internet Explorer - ieSpell 2.5.1 (build 106)

IE Spell


IESpell is a free Internet Explorer browser extension that spell-checks text-input boxes on a Web page. It should come in particularly handy for users who do a lot of Web-based text entry (Web mail, forums, blogs, diaries).

Even if your Web application already includes spell-checking functionality, this utility is faster than a server-side solution. Plus, you get to store and use your personal word list across all your applications instead of having to maintain separate ones on each application. Version 2.5.1 build 106 may include unspecified updates, enhancements, or bug fixes.


You can access ieSpell from Internet Explorer in 3 ways;


1) using the 'Tools' menu,


2) using the toolbar button, or


3) using the context (aka right-click) menu.


NOTE: If you are using MSN/AOL or other IE based browsers, only option 3 is available to you.

You may need to restart Internet Explorer for the changes to take effect.
 
Download link
 
Source

Surf the net on laptop with mobile phone as modem

Surf the internet on you computer with mobile phone as the modem

Ever wanted to surf the net but didn't have a modem on your computer? You don't realy need a modem to be able to surf the net,you can simply use your cell phone as a modem.  

HOW? 


This short tutorial will teach how to set your phone as a modem connected to your computer/laptop.

1. You need a cell phone. It has to have GPRS and it must be modem enabled.

2.You need a means of connection from your cell phone to your computer or laptop (inferred,bluetooth or usb cable)

3.You need a dialup connection

4.You need to know and change your proxy settings

Step 1: Take your gprs enabled cell phone and connect it to your computer or laptop using either buletooth,infered or a usb cable.

Step 2: Create a dial up connection.Go into your control panel,then into internet options.Then go to connections and add. Create a dial up connection and when it asks for a phone number type in *99#

Step 3: On your new dialup connection add the same proxy address you have on your gprs in your cell phone.

Step 4: Now on your cpanel there should be something called modem options (If your 's doesn't have you'll have to search your computer for an option that allows you to change the acess point name or also known as the APN) here you must change the APN to whatever your APN is on yor gprs in your phone.

Step 5: Go to start menu and connect,then connect to your dial up (make sure your cell phone is connected to your computer or laptop)

Step 6: Start your browser (internet exploxer,opera etc) and start surfing the net.

Note that every cell phone has it's own speed for example 3g phones can reach up to speed's of 48 kb/s.

Problems faced:
1. First problem is that in order to run, most phones need the drivers installed. Now either bluetooth, infared or cable modems will be installed from the disc you get when u buy one. Now on the disk it should have the drivers on there, if not you will need to find another internet connection and download them.

2. Next, you CANNOT use Firefox, Bit torrent apps, IM apps, Opera, or any web based programs besides IE if you are connecting through a Proxy address. Also another downside of a proxy is your computer wont store the cookies from the phone so logging into sites may be difficult. Now in order to get around this block and use web based applications u will need to dowload a program called "Your Freedom" (Just google it as I cant remember site ATM) then enter in YF your proxy settings and it will work, and then add the proxy setting of localhost:8080 for HTTP and localhost:1080 for Socks 5. This will let you use opera and Firefox.

Ok and now I will give you some tips on how to make most of your phone as a modem.

1. Use Firefox with the FasterFox extension set up on the max and your browsing speed will be much better. An alternative is to use Opera

2. Use a download manager to speed up your downloads by 4 times and some times up to 8 times (say your av. DL speed was 1.0 Kb/s it will increase it to 4.0 Kb/s becuase it will download te file in 4 different places at once.) I reccomend using Get Right.

3. Get premium version of Your Freedom as it will get rid of 2 hour time limit and max of 10 connections. And you cant get a crack for it or anything as it uses the info from the account you set up on their site.

Source


CutePDF Writer - Create PDF files for free

Create PDF documents on the fly — for Free! .. How? .. Let's see....

Portable Document Format (PDF) is the de facto standard for the secure and reliable distribution and exchange of electronic documents and forms around the world.  Copyrights of Adobe Systems
  

CutePDF Writer (formerly CutePDF Printer) is the free version of commercial PDF creation software. CutePDF Writer installs itself as a "printer subsystem".


This enables virtually any Windows applications (must be able to print) to create professional quality PDF documents - with just a push of a button!

Installation Requirements

    * Supports Microsoft Windows 98/ME/2000/XP/2003/Vista/7 (x86/x64).
    * Requires PS2PDF converter such as Ghostscript (recommended).
      You can get the free GPL Ghostscript 8.15 at this link here
Try now


What's New!!

    * Added support for both 32-bit and 64-bit Windows 7.
    * Added support for both 32-bit and 64-bit Windows Vista.
    * Added support for 64-bit Windows XP/2003.
    * Seamlessly integrate with CutePDF Professional.
    * New version works with the latest version of Ghostscript.
    * To use with other PS2PDF application, please refer to FAQs.
    * Supports foreign language Windows better.
    * No longer include Ghostscript. You may download and install it separately.

Download:


Try now  Free Download
   (Ver. 2.8; 3.83 MB)
Try now  Get Zipped Setup


What more!!
Its FREE !!  --> for commercial and non-commercial use only !
No watermarks!  No Popup Web Ads!


How it works?


Suppose you have a word document with some content in it.
You want to convert the DOC file into a PDF file.

1. Just go to Print command from the MS Word menu.
2. In the drop down you should see the entry of already installed CutePDF Writer. Select it.


3. Click on OK.
4. You would be asked the place where you want to save the PDF file.
Choose an appropriate place and click on Save.


Yoo hooo... Your PDF file is created!!!! :)


PLEASE SEE: NOT TO BE DISTRIBUTED FOR PERSONAL GAINS.
PLEASE RESPECT THE OWNER'S RIGHTS!


Firefox Bookmarks management

Bookmarks management in Firefox 3 onwards 
OR 
How to copy Bookmarks in Firefox 3 onwards

bookmarks.html stores bookmarks in Firefox 2 and below and in other Mozilla browsers. Starting in Firefox 3, places.sqlite is used instead of bookmarks.html for storing bookmarks.

The bookmarks.html is a file in the profile folder. Mozilla applications store a user's personal information in a unique profile. The first time you start any Mozilla application, it will automatically create a default profile; additional profiles can be created using the Profile Manager. The settings which form a profile are stored in files within a special folder on your computer — this is the profile folder. The installation directory also includes a "profile" folder but this folder contains program defaults, not your user profile data.

Operating system: Windows NT (NT4.x/2000/XP/Vista/7)
Profile folder location(s):  "%APPDATA%\Mozilla\"


Way to find the application data folder (profile folder):

Press [Windows Key]+ Run
→ Type in %APPDATA%
→ click OK


Editing bookmarks.html

Although the Bookmarks Manager is the primary interface for managing bookmarks, bookmarks.html can be edited directly. The file uses a simple HTML structure that includes definition lists, anchors, and headers. A typical bookmarks.html bookmark contains the URL, name, and other meta data:

ADD_DATE="1079992089" LAST_VISIT="1132078168" LAST_CHARSET=
"ISO-8859-1" ID="rdf:#$kLc2Z">Cascading Style Sheets, level
2 revision 1

The application should be closed before changes are made, else the changes will be overwritten.

 
Moving bookmarks.html

This file can be moved to a different profile without any extra effort.

Source1 , Source2

Personal Unblocking Code (PUC / PUK)


A PIN Unlock Code (PUC) or PIN Unlock Key (PUK) is used in GSM mobile phones and some smartcards to unblock a blocked card.

Most mobile telephones offer the feature of personal identification number (PIN) protection. After switching on the phone, if the PIN security function is active, the user is requested to enter a 4-8 digit PIN enabling the phone's non-emergency calling functions.

If the wrong PIN is typed in more than 3 times, either the SIM card, the device or both become locked. They can be reverted to their original unlocked state by entering a PUC (PUK), provided by the service operator through verification.

If the wrong PUC (PUK) is entered 10 times in a row, the device will become permanently blocked and unrecoverable, requiring a new SIM card. Cellular phone users are therefore advised by most providers to keep their PUC (PUK) written down in a safe place separate from the device.

The PUC (PUK) is a SIM-specific code assigned by the service provider. It is near-impossible to guess and enter it; thus, if you do not know your PUC (PUK) and are prompted for it, you should get it from your service provider.

Please note (for Indian customers): You may directly contact the service provider and get the PUK number. For this you just need to have the mobile number.

Also read post on mobile phone locked/ forgot phone unlocking password

Avoiding Blank Subject Lines in Outlook 2000 - 2007


Have you ever received an email with a blank subject line?  
Have you ever clicked "Send" only to realize that you forgot to add a subject?  It’s frustrating to receive a message with no subject.

Happily there’s a simple solution to this issue.
Through the use of a few lines of VBA (Visual Basic for Applications) code we can have Outlook check the subject line of every item we send.

 Follow these instructions to use this solution.

Outlook 2000 - 2003.
1.      Start Outlook.
2.      Click Tools > Macro > Visual Basic Editor.
3.      If not already expanded, expand Microsoft Office Outlook Objects and click on ThisOutlookSession.
4.      Copy the code below and paste it into the right-hand pane of Outlook's VB Editor window.
5.      Edit the code as needed.  I included comment lines wherever something needs to or can change.
6.      Click the diskette icon on the toolbar to save the changes.
7.      Close the VB Editor.
8.      Click Tools > Macro > Security.
9.      Set the "Security Level" to Medium.
10.      Close Outlook
11.      Start Outlook
12.      Outlook will display a dialog-box warning that ThisOutlookSession contains macros and asking if you want to allow them to run.  
Click Yes.

Lets do the same for Outlook 2007
 
1.      Start Outlook.
2.      Click Tools > Macro > Visual Basic Editor.
3.      If not already expanded, expand Microsoft Office Outlook Objects and click on ThisOutlookSession.
4.      Copy the code below and paste it into the right-hand pane of Outlook's VB Editor window.
5.      Edit the code as needed.  I included comment lines wherever something needs to or can change.
6.      Click the diskette icon on the toolbar to save the changes.
7.      Close the VB Editor.
8.      Click Tools > Trust Center.
9.      Click Macro Security.
10.      Set "Macro Security" to Warnings for all macros.
11.      Click OK.
12.      Close Outlook
13.      Start Outlook.  Outlook will display a dialog-box warning that This Outlook Session contains macros and asking if you want to allow them to run.  Click Yes..

Private Sub Application_ItemSend(ByVal Item As Object, Cancel As Boolean)
    If Item.Subject = "" Then
        'Edit the message and the popup caption on the next line as desired.'
        msgbox "You are not allowed to send an item with a blank subject.  Please enter a subject and send again.", vbCritical + vbOKOnly, "Prevent Blank Subjects"
        Cancel = True
    End If
End Sub


Let's test this!!
Create a test message and leave the subject blank. 
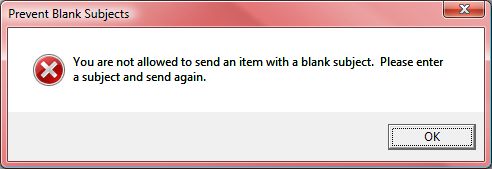
Click Send. 
Outlook should cancel the send and display a pop-up message that looks something like this.


Similarly, if you Forget to Add an Attachment to your Outlook Email here is the code to NOT repeat it!!!

Private Sub Application_ItemSend(ByVal Item As Object, Cancel As Boolean)
    'On the next line edit the list of keywords as desired.  Be sure to separate each word with a | character.'
    Const KEYWORDS = "attached|attachment|attachments|enclosed|enclosure"
    'On the next line edit the message that will be displayed when the message should include an attachment as desired.'
    Const WARNING_MSG = "Wording in the message suggests that something is attached, but there are no items attached.  Do you want to cancel the send and add an attachment?"
    'On the next line edit the dialog-box title as desired.'
    Const MSG_TITLE = "Attachment Checker"
    Dim objRegEx As Object, colMatches As Object, bolAttachment As Boolean, olkAttachment As Outlook.Attachment
    Set objRegEx = CreateObject("VBscript.RegExp")
    With objRegEx
        .IgnoreCase = True
        .Pattern = KEYWORDS
        .Global = True
    End With
    Set colMatches = objRegEx.Execute(Item.Body)
    If colMatches.count > 0 Then
        For Each olkAttachment In Item.Attachments
            If olkAttachment.Type <> olEmbeddeditem Then
                bolAttachment = True
                Exit For
            End If
        Next
        If Not bolAttachment Then
            If msgbox(WARNING_MSG, vbQuestion + vbYesNo, MSG_TITLE) = vbYes Then
                Cancel = True
            End If
        End If
    End If
    Set olkAttachment = Nothing
    Set colMatches = Nothing
    Set objRegEx = Nothing
End Sub

Effective Googling - Search google effectively


In my earlier post, I had listed some ways to search entities using google search. In this post, I enlist below some ways in which you could search using Google, in an effective way;


1. Need Exact Phrase? Use quotation marks!
eg: “infosys billion dollar”

2. Expand Search With Synonym?  Use a “tilde”
e.g.: “~infosys” finds IT companies similar to Infosys

3. Search by filetype (pdf, ppt, xls, doc)
e.g.: “.Net Framework” filetype:ppt

4. Negative Search Terms
e.g.: “nano –car” will return the results with word ‘nano’ but not Tata Nano car.

Please use " " marks to search specific results.

5. Limit your search results to a particular web site
e.g.: “sparsh site:infosys.com” will get the pages from infosys.com where the word ‘sparsh’ is referred.

6. Search for sites that link to a particular website:
e.g.: “link:infosys.com”

7. You’ve found a useful website & want to find other sites like it:
e.g.: “related:www.infosys.com”

8. Google is a Dictionary
Find definition of a word or a phrase?
e.g.:  define: scruples

9. Google is a Calculator as well :)


10. Google is Converter too..!
eg: Convert currency, units and a lot more


11. More Search Operators

allinanchor:
allintext:
allintitle:
allinurl:
cache:
group:
info:
time
weather


12. Use Specialty Search Functions

Google Images:
images.google.com
Google Blog Search: blogsearch.google.com
Google Finance:  finance.google.com
 
a. Google News Alerts news.google.com
Tracking an event in the news?
Create your own Google News alert – it’s free!
Can choose to monitor latest developments on web pages, blogs, Google news, Google discussion group pages, or all of these sources.

b. Google Scholar  
scholar.google.com 
Covers: law, medicine, social sciences, arts, humanities, business, & finance.
Included items: peer-reviewed papers, theses, book excerpts, abstracts & full-text articles
Sources for items: academic publisher web pages, professional societies, preprint repositories, universities, & other scholarly organizations.

c. Google Book Search 
books.google.com
Searches full text of indexed books.
If work is in public domain, full contents usually available.
If not, users can view bibliographic info (author, title, publisher) and perhaps some excerpts.
Library partners:  UC, Princeton, Stanford, Univ. of Michigan, Univ. of Texas, Oxford, UVA, Univ. of Wisconsin, ……

13. Something exciting at last !!!

Localized search
local.google.co.in
Effective localized search solution 

14. Movie search
google.co.in/movies
Find theatres running your desired movies in your city..wow

15. Code search
google.com/codesearch
Ssearch public source code

16. Google hack for finding movies/music
(warning: Not to be tried at office but home…!)
e.g.: intitle:”index.of”(mp3|mp4|avi|dat|mpeg) mummy

More Interesting stuff !!
Try...
Google Docs
Google Calendar
Google Reader
Google Gear
Google App Engine
Google Sites
Google Sets
Google Trends and so on…

What else??

Let's see the concept of "PageRank"

PageRank explained by Google:
Google interprets a link on page A going to page B as a vote -- by page A, for page B. Google looks at more than the sheer volume of votes, or links a page receives; it also analyzes the page that casts the vote. Votes cast by pages that are themselves "important" weigh more heavily.