Ads

Difference between GPS and GPRS

--> GPS
 

GPS is simply a way to find a specific location on the planet. At each point of the planet, at least three satellites should be in a straight line to the receiver for an accurate reading. That might not always be true, as in certain locations mountains and crevices might prevent a GPS device from having a direct line of sight to three satellites.

You might have also heard of the Galileo system, a new network of 30 satellites that the European Union plans to put into space beginning this year. The deployment of the Galileo system is expected to go on until the year 2008, when the system will be ready to perform its first commercial applications.

Current estimates put the cost of activating the Galileo system at 2.1 billion Euros. It is also estimated to run up a 220 million Euro bill a year just to maintain the network.

Either way, the basic operational concept of both systems is triangulation, which uses a GPS receiver to measure distance by bouncing radio signals off the satellites. Another interesting fact that few people know about is that the military has the most precise version of GPS, whereas the commercial versions have something intentionally left out so that the level of accuracy is not as good as the one used in a military application.

Likewise, certain applications for GPS require a monthly fee, and those applications are much more expensive than regular applications. Again, this is much more accurate than the regular version of GPS.


GPRS

GPRS may have one more alphabet, but it is an entirely different matter altogether. GPRS stands for General Packet Radio Services


This is a way of sending data through radio waves that are currently being used to transmit voice

The data in digital form is sent out in packets, or in mini-bursts that are decoded by the receiving unit, which can be one of those modern handsets that are GPRS-enabled


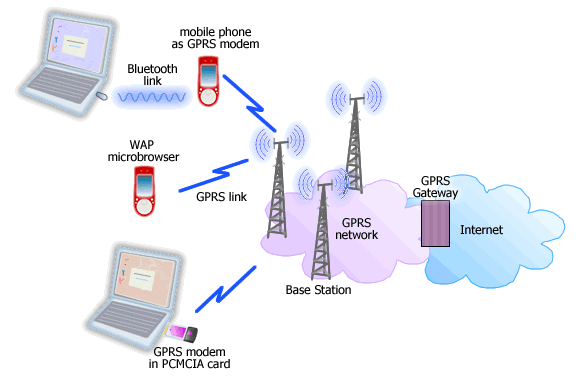
GPRS is an additional feature that is offered over a mobile telephone network. One of the key advantages of GPRS is speed, with estimations placing theoretical speeds at around 171 kbps if all eight timeslots are used. This would be close to 10 times the speeds available on Circuit Switched Data (CSD) networks. When you take this into account, it is easy to see why GPRS is viewed as being cheaper than competing SMS and CSD technologies.

GPRS also has the advantage of being ‘always-on’. There is no need for a dial-up modem, and your GPRS device is always on but you are charged only if you send or receive data across the network Of course, when we say always on, it also depends on the user being within range of a base station.

A couple of the current GPRS applications which are widely used are web browsing and chatting over the mobile network. Push-to-talk technology is starting to make its presence felt, and files are being transferred in ever-increasing volume over GPRS networks.

A possible area of growth for GPRS applications would be in the area of remote control, where you are able to access and control your house and the appliances within that house. You could activate and deactivate the alarm protecting your house, switch on and off electrical lights at random, and maybe even start the air-conditioning running before you even get home. 


More on GPRS

To summarise, GPRS is a data service that transports its data in the form of packets. This means that the information transfer is achieved by breaking down data into packets before sending it, and then reassembling said data after it has been transmitted and received. This is very similar to how the Internet operates, where data is also broken down into bits and sent to desktop browsers.

Using packets to transfer data also means that the available bandwidth for GPRS use can be shared between several users, which is a much more efficient method than allocating one channel for each user.

GPRS is good for the mobile Internet because most Internet pages can port directly over to a GPRS browser. This means that you can access most Internet websites on a complaint handheld device. With the power of the Internet at your fingertips, you should be able to access nearly any sort of information that you take a fancy to in just a matter of minutes, if not seconds.

The best part of this is that GPRS is not merely limited to GSM networks. The Time Division Multiple Access (TDMA) networks that are common to both North and South America will also support the use of GPRS. 


Source


Search results

How does a search engine fetch answers to your queries in less than second?

Get started with PivotTable reports in Excel 2007


Your worksheet has lots of data, but do you know what the numbers mean? Does your data answer all your questions? PivotTable reports can help to analyze numerical data and answer questions about it.


In seconds you can see who sold the most, and where. See which quarters were the most profitable, and which product sold best. Ask questions, see the answers.

With PivotTable reports, you can look at the same information in different ways with just a few mouse clicks. Data swings into place, answering questions, telling you what the data means.

In this short course you'll learn how PivotTable reports work and you'll make a PivotTable report in Excel 2007.


Make sense out of data.
Learn about Microsoft Office Excel 2007 PivotTable reports, a fast and powerful way to analyze data and answer questions you have about it.

About this course
This course includes:

    1) One self-paced lesson and one practice session for hands-on experience. The practice session does not require you to have Excel 2007 on your computer.
    2) A short test at the end of the lesson; tests are not scored.
    3) A Quick Reference Card you can take away from the course.

Goals
After completing this course you will be able to:

    1) Use a PivotTable report to analyze and summarize your data.

Level: Intermediate
Length: 40 - 50 minutes

How To Manage Hibernate Mode in Windows


If you don’t use the Hibernate option in Windows 7, you can save some disk space by disabling it. Here we will look at a few different ways to manage hibernate options in Windows 7.

Note: Hibernate mode is not an option on systems with 4GB of RAM or more.

Enable or Disable Hibernate Through Command Prompt

Using the Command Prompt might be the easiest way to enable or disable Hibernation. Click on Start and type CMD into the search box and it will be listed under programs. Right-click on the icon and select Run as administrator. 


The Command Prompt opens and you will use the following to enable Hibernation.

    powercfg /hibernate on


 Type in the following to disable hibernation.

    powercfg /hibernate off


Manage Hibernation Through Control Panel

Click on Start and open Control Panel then click on Power Options.


On the left side click on Change when the computer sleeps.

Now click on Change advanced power settings.


In the Advanced Power Options window expand the Sleep tree then expand Hibernate after and change the minutes to zero to turn it off. Or you can specify the amount of minutes you want to pass before it goes into hibernation. 

After you’ve made your selection click Apply and Ok then close out of the remaining screens.


Where is Hibernate?

What if you try the command line option to turn it on and Hibernate mode still isn’t available? Then what you’ll want to do is disable Hybrid Sleep by expanding Allow hybrid sleep and turning it Off.
 

Now you should have Hibernate and Sleep as part of the power options in the start menu and will also be an option when you hit Ctrl+Alt+Del.


Disable Hibernate Through Regedit

Note: Changing registry values can cause your computer to become unstable or stop functioning and is only recommended for experienced users.

Now that the disclaimer is out of the way…you might want to completely disable Hibernate mode through a registry edit. Open the Registry and browse to HKEY_LOCAL_MACHINE \ SYSTEM \ CurrentControlSet \ Control \ Power and change both HiberFileSizePercent and HibernateEnabled value data to zero. After you’ve made the changes close out of the Registry Editor and restart the machine.


If you always turn off your computer or never do, you can disable the Hibernate mode to gain a bit of extra hard disk space. On our Windows 7 (32-bit) machine with a 300GB hard drive, disabling Hibernation gained us just over 3GB of more disk space. That may not seem like much especially with today’s high capacity drives, but if you don’t need Hibernation, why not reclaim that space?

Source

How to install Windows 7 themes?

Where should I copy my themes to?

To install your 3rd-party themes you have to copy your themes to the folder C:\Windows\Resources\Themes
 
Let’s take a peek at that folder to understand how it works:

Windows 7 Themes Folder

The themes folder has some .theme files but also a folder called “Aero”. This folder is part of the Aero theme (aero.theme). The folder MUST have the exact name of the .theme file (in this case Aero). The folder name is case-insensitive.

Download new Windows 7 themes from the official website @ 

PS: If you download a *.themepack file, just double click on it and it will get installed on your Windows 7.

If you still facing issues installing the themes, please visit the following blog to check out the other methods for installing the windows 7 or other OS's themes.
http://windows7themes.net/how-to-install-windows-7-themes.html

Enjoy!!

Convert to PDF documents on the fly for Free!


Portable Document Format (PDF) is the de facto standard for the secure and reliable distribution and exchange of electronic documents and forms around the world. CutePDF Writer is the free version of commercial PDF converter software. CutePDF Writer installs itself as a "printer subsystem". This enables virtually any Windows applications (must be able to print) to convert to professional quality PDF documents - with just a push of a button!


You will require the following to be installed on your machine:
Free Download

Free Converter

Source


How To Convert Delimited Text Files To Excel Spreadsheets


I am not much of an Excel hand; spending most of my time either in Microsoft Word or PowerPoint. My most regular use of Excel is as a tool to keep track of my schedule and to list what I am putting out on the web as a writer. So I can safely say that at least in my case, the enormous power that’s in this spreadsheet program lies latent. But it happens to all of us that sometimes some tasks, if not taken, get thrust upon us (just like greatness!).

So it was with me when I had to convert a delimited text data file to Excel and format it within the columns and rows. That’s a rough challenge for a guy who has a chronic fear of anything that resembles figures. The raw file that I had in my hand consisted of higgledy-piggledy blocks of text and numbers. My simple task was to make sense out of this jumble by importing it into Excel and sorting the data into columns and rows.

Delimited files are a simple way to store data and import or export it between various applications. Delimited in essence means, data that’s separated by specific delimiter characters. Common delimiters are tab, comma and semicolon.


A delimited file is of no actual use unless it is converted into some form suitable for analysis and study. Microsoft makes it easy to convert a delimited file to a spreadsheet in three easy steps.

Let’s start with a text file with some data separated by commas.

To bring the data into Excel ““

1.Open Excel and copy-paste the text contents into a spreadsheet. The contents take up one column and several rows.


2.Click on the column header to select the entire column. Click on the Data tab in the ribbon and then Text to Columns in the Data Tools group.


3.Clicking on the above command opens the Convert Text to Columns Wizard.

4.Alternatively ““ You can directly import a text file into Excel. Excel handles file types – Text, Comma Separated Values and Printer Text File. Make sure to dropdown to All Files or Text Files in the File Open dialog while selecting the file to import. If Excel recognizes it to be a delimited file, it opens the Text Import Wizard which is similar to the Convert Text to Columns Wizard.

In the Wizard, choose Delimited and click on Next.
[I use the Fixed Width option normally]


5.In the second step, choose the Delimiter for you particular file (comma, in our case). For some other character, check Other and enter the character in the little field. The Data Preview window gives you an idea how the contents get separated into columnar data. Click on Next.

6.In the final window, you get to set the data type for each column by selecting it in the preview. The default data format is General. Date and numeric values can also be handled here.


7.Click on Finish to exit the wizard and get your neatly arranged spreadsheet.


It’s just three easy steps courtesy of a wizard. This simple utility gives us the ability to import delimited text files into Excel and apply its number crunching tools on it.

Liked this? We have other Excel tutorials to make an analyst out of you.

Freeing up space on Windows 7


Warranty: There is none. Please read carefully and with all things you find on a random blog, be careful because you have no one to blame but yourself. However, if you take a few minutes, read carefully and do even a few of these tips or just run Disk Cleanup, you'll get lots of space back.

Now, the EASIEST way to handle this is just to run Disk Cleanup, then click More Options and "Clean up…" which will delete all but the most recent System Restore data. That's what I did. That got me back lots of space back on my C: drive.

If that doesn't improve the memory spce try the following.

1) Clean up after Windows 7 SP1 (Service Pack 1) - After you install Windows 7 SP1, it leaves around the original files so you can uninstall the Service Pack if you want. After a few months with the Service Pack, I've decided for myself that it's a good thing and decided I don't need the option. In Vista there was a command line tool called "vsp1cln.exe" but in Windows 7 you can run Disk Cleanup and check "Service Pack Backup Files" and get back almost a gig of space.

The only thing, again is that you can't uninstall SP1. Fine with me.

2) Disk Cleanup - It's amazing to me the number of people who DON'T run Disk Cleanup. It's even better in Windows 7. Just run it. Often. After you run it, run it again and click Clean Up System Files to get files that you need to be admin to delete.

3) Disable Hibernate - I have a desktop, and I prefer just three power states, sleeping, on or off. I don't use Hibernate. Plus, I have 12 gigs of RAM, and hibernation uses as much disk space as you have RAM. From an administrative command prompt, type "powercfg -h off" to get that space back. Got me back 12 gigs. It's up to you. Don't turn it off if you use the feature.

4) %TEMP% Files - Even though Disk Cleanup is great, sometimes for whatever reason it doesn't always get stuff out of the TEMP folder. I recommend you try to delete the TEMP folder. I do this from the command line. Open up an administrative console, type "cd /d %TEMP%" (without the quotes, of course). Then, go up one folder with "cd .." and type "rd /s temp"

Do be warned, this command says to TRY to delete the whole folder and everything underneath it. It's very unambiguous. If you don't feel comfortable, don't do it. If you feel in over your head, don't do it. If it screws up your computer, don't email me. Next, I do a "dir temp" to see if the folder really got deleted. It usually doesn't because almost always some other program has a temp file open and the command can't get remove everything. If it DOES remove the folder, just "md temp" to get it back fresh and empty. This got me back 12 gigs. I'm sure you'll be surprised and get lots back.

5) Delete your Browser Cache - Whether you use Chrome, IE9 or Firefox, your browser is saving probably a gig or more of temporary files. Consider clearing it out manually (or use the CCleaner mentioned below) occasionally or move the cache from your browser's settings to another drive with more space.

6) Clean up System Restore - Windows 7 keeps backups of lots of system files every time something major (driver installation, some software installations, etc) happens, and after a while this can take up lots of space. It uses a service/subsystem called ShadowCopies and can be administered with a tool called vssadmin.

You can also go to System Properties, then System Protection, then Configure and not only control how much space to allow for System Protection but also delete preview restore points as seen in the screenshot at left.

Alternatively, you can use the vssadmin tool from an admin command prompt to to do important things. One, you can set a max size for the System Restore to get. Two, you can set an alternative drive. For example, you could have the D: drive be responsible for System Restore for the C: drive.

You can use the commands like this. Note that you can put whatever drive letters you have in there. I ran it for each of my three drives. Note that this isn't just used for System Restore, it's also used for the "Previous Versions" feature of Windows that keeps some number of Shadow Backups in case you delete something and didn't mean it. Kind of a mini, local time machine. Point is, this isn't a feature you probably want off, just one you want kept to a max.

Here's the command line I used. Your mileage may vary.

vssadmin Resize ShadowStorage /On=C: /For=C: /MaxSize=15GB


7) Wasteful TempFiles/ScratchFiles Settings in Popular Programs - Most programs that need scratch space have a way to set a ceiling on that Max Space. Go into Internet Explorer or Firefox, into the options and delete the Temporary Internet Files. Set a reasonable size like 250 megs or 500 megs. I've seen those cache sizes set to gigs. If you've got a speedy connection to the internet, that's just overkill. Check other programs like Adobe Photoshop and other editors and see where they store their temporary files and how large they've become. I used SpaceSniffer (mentioned above) and was shocked to find 5 gigs of old temp files from a year ago in little used programs.

8) NTFS Compression - That's right, baby, Stacker (kidding). This is a great feature of NTFS that more people should use. If you've got a bunch of folders with old crap in them, but you don't want to delete them, compress. If you've got a folder that fills up with text files or other easily compressed and frequently access stuff, compress 'em. I typically compress any and all folders that are infrequently accessed, but I'm not ready to toss. That is about 30-40% of my hard drive. Why bother to compress when Disk Space is so cheap? Well, C: drive space usually isn't. I've got an SSD, and it's small. I'd like to get as much out of it as I can without the hassle of moving my Program Files to D:. More importantly, Why the heck not? Why shouldn't I compress? It's utterly painless. Just right click a folder, hit Properties, then Advanced, then Compress. Then forget about it. As long as you're not compressing a bunch of ZIP files (won't do much) then you're all set. You might consider defragging when you're done, just to tidy up if you don't have an SSD.

9) Find Fat Temp File Apps and squash them - Google Earth and Microsoft Virtual Earth 3D are really fast and loose with the disk space. You can poke around for a while and next thing you know you're down 2 gigs or more. If you don't use the app a lot, delete the caches when you exit, or better yet, make the cache size for each app small.

ADVANCED: Use Junction Points/Hard Links/Reparse Points to move temp file folders - This is an advanced technique. If this technique kills your beloved pet cat, don't email me. You have been warned. Also, note that I'm only saying it works for me.

I reclaimed 25 gigs just today by moving the MobileSync Backup folder from iTunes to a spinning rust disk off my SSD.

Here's the idea. You'll move it to a drive with more space, but you'll LIE to iTunes using a little-used Windows Utility that will make a LINK between the folder iTunes expects to find and the folder you want your backups in. See? It's advanced but VERY powerful, especially when you

C:\Users\Scott\AppData\Roaming\Apple Computer\MobileSync>dir

Directory of C:\Users\Scott\AppData\Roaming\Apple Computer\MobileSync

11/25/2011 10:10 PM

11/25/2011 10:10 PM Backup [f:\iTunesMobileSync\Backup]

0 File(s) 0 bytes

3 Dir(s) 97,594,851,328 bytes free


Improving the speed of Windows 7 system

1. Disabling the Search Indexing Feature in Windows 7

◦Right Click the “Computer” Icon in the desktop and select “Manage”.

◦Click “Services and Applications” in the “Computer Management” window.

◦Click on “Services”.

◦You can see a lot of services listed there. Look for “Windows Search”.

◦Right Click on “Windows Search” from the list and choose “Properties”.

◦The “Windows Search Properties Window” will open up. From “Startup type” click on the drop down menu and choose “Disabled”.

◦Click “Apply” then “OK” and that’s it. The Windows 7 Search Indexing Feature is now disabled.

Most of the Windows 7 users do less searches in there system. The Search Indexing service in Windows 7 will index keeps track of the files so that they can be found quickly when asked at some other time. This feature is useful only if you perform frequent searches on your system.

For occasional file searchers the Search Indexing service in Windows 7 is a total resource hog. It unknowingly eats up your system resources. What you need from windows 7 is maximum performance from it then i would certainly recommend you to disable this resource hogging Windows 7 Search Indexing Feature.

To Disable the Search Indexing Feature in Windows 7

If you want to completely disable the search indexing feature in Windows 7 you can set the Search Indexing Service to Manual (See the above method about disabling unwanted services).

2.Disable the Aero Theme on Windows 7

◦Right Click on your Desktop and select ” Personalize ” click the Window Color Tab.

◦Uncheck the Box saying ” Enable Transparency ” and then click on ” Open classic appearance properties for more color options”.

◦Then a window will open up. Apply a Standard or Basic theme from it. The Standard Windows 7 theme is more preferred.

The aero user interface certainly adds some ” Eyecandy ” to Windows 7 but certainly is a resource hog especially when, what you expect from windows 7 is more performance juice. Aero user interface squeezes your graphics or video card to its maximum. So why dont we just avoid the Windows 7 aero? if we care more about speed and performance in Windows 7. So Disabling the Aero in Windows 7 certainly adds an extra speed boost to it.

Disabling the aero theme alone in Windows 7 will really speed things up. You can know this by looking into the memory consumption when aero is turned on and off.

3.Disabling the Unwanted Visual Effects in Windows 7
◦For this right click on ” Computer” and select “Properties” from the right click menu.

◦Click on ” Advanced System Settings ” from the left pane to open up the ” System Properties ” window.

◦Select the “Advanced” tab from it. Then Under ” Performance ” click ” Settings “. Choose ” Custom: ” Options From it.

◦Now un tick all the options and select only the last four options (actually three only needed; you can un tick the second option from the last four). See the screen shot if you have any doubt.

◦Now just logoff your system and turn logon.

Even though we have tuned off the aero effects in Windows 7 still there are many unwanted visual effects that can be safely disabled to speed up windows 7 even more.

You will now notice the speed difference now.

4.Disabling the Unwanted Services to Speed up Windows 7

There are many services in windows 7 that we dont require for our daily use. There are some exceptional cases though. Services such as “print spooler” is only needed when we use a printer. If we use a printer only occasionally we can safely turn off that service in Windows 7 and turn it on only when we need to take a print.

I have previously prepared a List of services in Windows 7 that can be safely set to manual / disabled.

Disabling the unneeded services in Windows 7 can really speed up the system boot time.

5.Disable the User account control (UAC) Feature in Windows 7

◦From the Control Panel open the ” User Accounts and Family Safety ” > User Account.

◦Click the User Account Control settings link.

◦Now just Drag the Slider towards “Never Notify”.

◦Click “OK” and Reboot your system.

The User account control (UAC) feature in Windows 7 is very annoying though it says it can protect your computer from harmful virus activity etc. But if you are a daily user of your computer this windows 7 feature will be a total nuisance to you.

To Disable and Turnoff UAC in Windows 7

Disabling UAC is for advanced users only its not recommend doing it if not.

6.SetUp the Windows 7 Ready Boost Service for an Extra Speed Boost

◦To configure the Ready Boost Feature in Windows 7 you need to have a High Speed Flash/USB or Pendrive with you which is ready boost compatible.

◦After plugging you pendrive, open “Computer” > Right-click the on USB Drive/Pendrive > select “Ready Boost” tab > tick the “Use this device” checkbox.

◦You can configure how much space on your USB drive/ Pendrive to be used as Ram.

The ready boost feature in Windows 7 will help you to use your flash drive or pendrive or USB drive as Ram there by improving the performance and speed of windows 7 greatly. You can certainly experience it when launching bulky applications such as Adobe Photoshop etc.


7.Turn off Unused Windows 7 Features

◦Open up ” Programs and Features ” from Control Panel.

◦Click the ” Turn Windows features on or off ” from the left pane.

◦Now uncheck all the Feature that you don’t use in Windows 7 and restart the system for the changes to take effect.

There are many feature in windows 7 that we often don]t use. Disabling these unused features in Windows 7 will really help in speeding things up.

8.Disable the Windows 7 Sidebar (Actually the Gadgets)

◦Right click on the sidebar and select ” Properties “.

◦On the properties windows untick the check box showing ” Start sidebar when Windows Starts “

◦From now on windows sidebar won’t start when windows 7 start up.

Disabling the window 7 sidebar is definitely help you to to gain a few seconds during start up time. There are many useful utilities such as the RocketDock etc. which are good application launchers.

To Disable the Sidebar in Windows 7,

9.Disable the Aero Peek and Aero Snap features in Windows 7

◦Open the Windows 7 ” Control Panel ” and double-click on ” Ease of Access Center ” icon.

◦Now click on the ” Make it easier to focus on tasks ” seen at the bottom in there

◦Now untick the check box saying ” Prevent windows from being automatically arranged when moved to the edge of the screen ” .

◦Right click on the Windows 7 taskbar and select ” Properties “.

◦Now untick the ” Use Aero Peek to preview the desktop ” option from there.

Aero Snap will help you to maximize, minimize and resize the windows just by dragging and dropping it into the screen corners.

To disable Aero Snap Feature in Windows 7,
That will now disable the Aero Snap in Windows 7.

Now To Disable the Aero Peek feature in Windows 7

The Aero Peek feature in Windows 7 helps you to peek through all open windows by hiding all other windows and showing only the outlines of all windows. Aero Peek is similar to the ” Show Desktop ” Feature in XP and Vista.

If you have followed step 3 then Aero Peek will be automatically disabled. If not,

The aero peek feature will now be disabled in windows 7.

10.Change the Power Plan To Maximum Performance

◦Double click the ” Power Options ” in the Control panel.

◦Click the down arrow showing ” Show Additional Plans ” to see the ” High Performance ” power plan

◦Now just activate the ” High Performance ” plan and that’s it.

◦You may go for the advanced settings for further tweaking if you want.

The Power settings in Windows 7 is not automatically set for maximum performance. By default the power plan in Windows 7 is set for a balanced performance with energy consumption on hardware. So you may not get the optimal performance from windows 7 if this is the case. So we need to change the power plan to High Performance Mode.

11.Disable the Thumbnail Preview Feature to speed up File browsing

◦Double Click on ” Computer ” >click on the “Organize” drop-down menu and select the “Folder and Search options”

◦Under ‘Files and Folders’ section, go to the “View” tab and tick the check box showing “Always show icons, never thumbnails” checkbox.

The thumbnail preview feature in Windows 7 will show the small thumbnails of the contents of a folder instead of showing it’s icon. But this feature really do take up some system resources. So by disabling the Thumbnail Preview feature in Windows 7 the file browsing in Windows 7 explorer can be speed up.


How to Reset or Change Microsoft Office 2007 Product License Key or Volume License Key (VLK)


You may need to alter or change Microsoft Office 2007 (aka 2007 Microsoft Office System programs and suites) product license key or volume license key (VLK) which also known as serial number or CD key. You can modify or change product key for 2007 Microsoft Office programs or suites by first uninstall or remove Microsoft Office and then reinstalling the business productivity suite. However, you can follow the following steps in order to reset and change the Microsoft Office 2007 product serial key without the need to uninstall or reinstall 2007 Office system suites.

Note: The following steps involve modification of registry key values, which may corrupt your Windows if done incorrectly. Backup registry first before performing the workaround.

    Close all Microsoft Office programs.
    Click on Start button, then click on Run.
    Type “regedit” (without quotes) in the Run text box, and click OK or press Enter.
    Locate and then click the following subkey:

    HKEY_LOCAL_MACHINE \Software\Microsoft\Office\12.0\Registration

    Inside, you will find another subkey that resembles the following subkey:

    HKEY_LOCAL_MACHINE\SOFTWARE\Microsoft\Office\12.0\Registration\{30120000-0011-0000-0000-0000000FF1CE}

    Tip: For user with 64-bit (x64) Windows, go to HKEY_LOCAL_MACHINE\SOFTWARE\Wow6432Node\Microsoft\Office\12.0 instead.
    Optional: Backup this registry branch by exporting the Registration subkey to a file, just in case the new product key does not work and you have to restore back the old product key. To export the registry, right click on the Registration subkey and click on Export, and follow the on-screen prompt to enter a file name for the registry file and choose a location to store it.
    Under the Registration subkey, there may be several Globally Unique Identifiers (GUID) subkey that contain a combination of alphanumeric characters. Each GUID is specific to a program that is installed on your computer.

    If you find additional subkeys that reference Microsoft 12.0 registration, then click and open each GUID subkey to view and identify the Office product version by the ProductName registry entry in the right pane. For example:

    ProductName=Microsoft Office Professional Plus 2007
   
After you find the GUID subkey that contains your Office product or program which you want to remove the existing product license key or registration details, delete the following registry entries by right clicking on the registry entry in the GUID subkey, click Delete, and then click Yes:

    • DigitalProductID
    • ProductID
    Exit Registry Editor.
    Run or open an Office application program, such as Microsoft Word or Excel or Outlook. Office 2007 will prompt you to enter a new 25-character product key.
    Type in the valid and genuine product key, and then click OK.
    Then when prompted to choose your preferred type of Microsoft Office 2007 installation, press on “Install Now”.
    Microsoft Office 2007 will be updated with new product CD key or volume license key, and ready for activation (if it’s a non-VLK serial) or use.

Note: If you’re having problem with your new Office 2007 product key, simply double click on the backup registry .reg file created at the optional step above to restore the registry settings of the Registration subkey so that the original value can be imported back to the registry.

You may need to reset to change Office 2007 product key with the above steps if you don’t want to uninstall or reinstall Microsoft Office 2007 again in many scenarios, such as you have just bought a retail version of Office 2007, or receive Office 2007 as a gift, or win MS Office 2007 as a prize, or just get your MSN product key for Office 2007, or having problem with activation process online or via phone, or unable to step-up or convert evaluation copy of Office 2007 to full-use version, or having problem with Office Genuine Advantage (OG) validation.

On the other hand, if you manage to find a valid and genuine volume license key or VLK, you can change the product key of Microsoft Office 2007 with the VLK serial in order to bypass the Office 2007 activation process (as Office 2007 still using WPA 1.0 where corporate users need not to activate), without the need of crack or hack for Office 2007, for full use for unlimited period as long as you’re not caught by OGA.

The 2007 Microsoft Office System product key changing instruction and step-by-step guide tutorial is applicable to Microsoft Office Basic 2007 all editions and all individual programs or suites of Microsoft Office 2007 including Microsoft Office Enterprise 2007, Microsoft Office Home and Student 2007, Microsoft Office Professional 2007, Microsoft Office Professional Plus 2007, Microsoft Office Standard 2007, Microsoft Office Ultimate 2007, Microsoft Office Access 2007, Microsoft Office Excel 2007, Microsoft Office InfoPath 2007, Microsoft Office OneNote 2007, Microsoft Office Outlook 2007, Microsoft Office PowerPoint 2007, Microsoft Office Project Professional 2007, Microsoft Office Project Standard 2007, Microsoft Office Publisher 2007, Microsoft Office SharePoint Designer 2007, Microsoft Office Visio Professional 2007, Microsoft Office Visio Standard 2007 and Microsoft Office Word 2007.