You can use the Voting Buttons to get responses from a group of colleagues to see what the majority of them are leaning towards. This comes in handy when getting feedback for a meeting date and location or for figuring out where everyone is going to meet after work.
Outlook tallies the votes for you so that they can easily be assessed.
To Insert Voting Buttons into your Message:
1. Create your New Message.
2. Select the Options tab.
3. Select Use Voting Buttons.
4. Choose the voting buttons you wish to use from the four options provided (Approve; Reject, Yes; No, Yes; No; Maybe, or Custom).
5. Make sure your message is the way you want it, including the question or statement that is to be voted on. Make sure you have included the proper recipients for the email message.
6. Click Send.
The recipients of your message will notice a highlighted line of text (vote by clicking Vote in the Respond group above) showing up above the From line in the email. By clicking Vote, they will be shown the voting options to select from.
After they select the desired voting option, a confirmation prompt will appear showing their selection and giving them the choice of sending the response or editing the response before sending.
Getting a Tally of the Votes:
You will receive the replies to your message with the selected voting option in the subject line. You could tally the votes yourself, however if you sent the message out to a large number of recipients, this could be rather time consuming. A better method is to let Outlook tally the votes for you.
1. Go to your Sent Items.
2. Open the message that had the voting buttons.
3. Go to the Ribbon.
4. In the Show section, select Tracking.
You will see the reply totals followed by a list of the individual votes.
Have you ever received an email with a blank subject line?
Have you ever clicked "Send" only to realize that you forgot to add a subject? It’s frustrating to receive a message with no subject.
Happily there’s a simple solution to this issue.
Through the use of a few lines of VBA (Visual Basic for Applications) code we can have Outlook check the subject line of every item we send.
Follow these instructions to use this solution.
Outlook 2000 - 2003.
1. Start Outlook.
2. Click Tools > Macro > Visual Basic Editor.
3. If not already expanded, expand Microsoft Office Outlook Objects and click on ThisOutlookSession.
4. Copy the code below and paste it into the right-hand pane of Outlook's VB Editor window.
5. Edit the code as needed. I included comment lines wherever something needs to or can change.
6. Click the diskette icon on the toolbar to save the changes.
7. Close the VB Editor.
8. Click Tools > Macro > Security.
9. Set the "Security Level" to Medium.
10. Close Outlook
11. Start Outlook
12. Outlook will display a dialog-box warning that ThisOutlookSession contains macros and asking if you want to allow them to run.
Click Yes.
Lets do the same for Outlook 2007
1. Start Outlook.
2. Click Tools > Macro > Visual Basic Editor.
3. If not already expanded, expand Microsoft Office Outlook Objects and click on ThisOutlookSession.
4. Copy the code below and paste it into the right-hand pane of Outlook's VB Editor window.
5. Edit the code as needed. I included comment lines wherever something needs to or can change.
6. Click the diskette icon on the toolbar to save the changes.
7. Close the VB Editor.
8. Click Tools > Trust Center.
9. Click Macro Security.
10. Set "Macro Security" to Warnings for all macros.
11. Click OK.
12. Close Outlook
13. Start Outlook. Outlook will display a dialog-box warning that This Outlook Session contains macros and asking if you want to allow them to run. Click Yes..
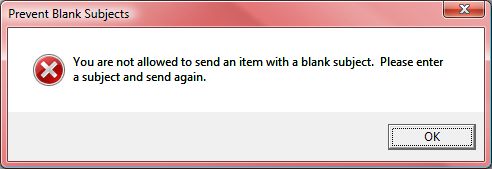
Private Sub Application_ItemSend(ByVal Item As Object, Cancel As Boolean) If Item.Subject = "" Then 'Edit the message and the popup caption on the next line as desired.' msgbox "You are not allowed to send an item with a blank subject. Please enter a subject and send again.", vbCritical + vbOKOnly, "Prevent Blank Subjects" Cancel = True End If End Sub
Let's test this!!
Create a test message and leave the subject blank.
Click Send.
Outlook should cancel the send and display a pop-up message that looks something like this.
Similarly, if you Forget to Add an Attachment to your Outlook Email here is the code to NOT repeat it!!!
Private Sub Application_ItemSend(ByVal Item As Object, Cancel As Boolean) 'On the next line edit the list of keywords as desired. Be sure to separate each word with a | character.' Const KEYWORDS = "attached|attachment|attachments|enclosed|enclosure" 'On the next line edit the message that will be displayed when the message should include an attachment as desired.' Const WARNING_MSG = "Wording in the message suggests that something is attached, but there are no items attached. Do you want to cancel the send and add an attachment?" 'On the next line edit the dialog-box title as desired.' Const MSG_TITLE = "Attachment Checker" Dim objRegEx As Object, colMatches As Object, bolAttachment As Boolean, olkAttachment As Outlook.Attachment Set objRegEx = CreateObject("VBscript.RegExp") With objRegEx .IgnoreCase = True .Pattern = KEYWORDS .Global = True End With Set colMatches = objRegEx.Execute(Item.Body) If colMatches.count > 0 Then For Each olkAttachment In Item.Attachments If olkAttachment.Type <> olEmbeddeditem Then bolAttachment = True Exit For End If Next If Not bolAttachment Then If msgbox(WARNING_MSG, vbQuestion + vbYesNo, MSG_TITLE) = vbYes Then Cancel = True End If End If End If Set olkAttachment = Nothing Set colMatches = Nothing Set objRegEx = Nothing End Sub
Assuming you have IMAP enabled for your Gmail account, follow these steps to configure Outlook for IMAP access:
1. In the main Outlook menu, click Tools then Account Settings. This opens the Account Settings dialog box.
2. On the E-mail tabbed page, click New. This launches the Add New E-mail Account wizard.
3. On the Choose E-mail Service screen, select Microsoft Exchange, POP3, IMAP, and HTTP, then click Next. The Auto Account Setup screen appears.
4. On the Auto Account Setup screen, set the Manually configure server settings or additional server types checkbox, then click Next. A different Choose E-mail Service screen appears.
5. Select Internet E-mail, then click Next. The Add New E-mail Account screen appears.
Enter your name and your full Gmail e-mail address, including the '@gmail.com.'
For Account Type, select IMAP.
In the Incoming mail server field, enter imap.gmail.com, and in the Outgoing mail server field, enter smtp.gmail.com.
In the Logon Information section, enter your Gmail user name and password.
Set the Remember password checkbox so Outlook can work with your Gmail account without requiring you to enter your logon information constantly.
Click the More Settings button. This opens the Internet E-mail Settings dialog box.
On the Advanced tabbed page, set the Incoming server (IMAP) to 993.
For the Use the following type of encrypted connection, select SSL.
Set the Outgoing server (SMTP) to 587.
For the Use the following type of encrypted connection, select TLS.
Click OK to close the Internet E-mail Settings dialog box.
Click Next, then Finish, then Close to complete the process.
Once you complete all the steps successfully, Outlook connects to your Gmail account and downloads messages. You will find a new set of folders that corresponds to your Gmail account in the Navigation pane.
Configuring Outlook 2003 or XP for Gmail IMAP Access
If you are not using Outlook 2007, follow these steps to configure Outlook for IMAP access to your Gmail account:
In the Outlook main menu, click Tools, then E-mail Accounts. This launches the E-mail Accounts wizard.
Select Add a new e-mail account, then click Next.
Select IMAP, then click Next.
Enter your name and your full Gmail e-mail address, including the '@gmail.com.'
For Account Type, select IMAP.
In the Incoming mail server field, enter imap.gmail.com, and in the Outgoing mail server field, enter smtp.gmail.com.
In the Logon Information section, enter your Gmail user name and password.
Set the Remember password checkbox so Outlook can work with your Gmail account without requiring you to enter your logon information constantly.
Click the More Settings button. This opens the Internet E-mail Settings dialog box.
On the Advanced tabbed page, set the Incoming server (IMAP) to 993.
For the Use the following type of encrypted connection, select SSL.
Set the Outgoing server (SMTP) to 587.
For the Use the following type of encrypted connection, select TLS.
Click OK to close the Internet E-mail Settings dialog box.
Click Next, then Finish, then Close to complete the process.
Once you complete all the steps successfully, Outlook connects to your Gmail account and downloads messages. You will find a new set of folders that corresponds to your Gmail account in the Navigation pane.
I have faced lot of issues while configuring this one!
Let's see how to do this...
Ready to configure Outlook for Gmail POP3 access?
This page includes step-by-step instructions for creating a Gmail Outlook connection (Outlook 2003 > 2007) using the POP3 mail protocol.
One of the really nice things about Outlook 2007 is the way it can automatically configure email accounts at many of the major services.
Gmail is one of those services.
Compare the instructions for automatically configuring a Gmail account in Outlook 2007 to those further down the page for earlier versions. Nine steps instead of 19. That's a major reduction in the work required to configure Outlook with Gmail.
Configuring Outlook 2007 for Gmail POP3 Access
If you are using Outlook 2007, follow these steps to configure Outlook for Gmail POP3 account use:
1. In the Outlook main menu, click Tools, then Account Settings. This opens the Account Settings dialog box.
2. Click New to launch the Add New E-mail Account wizard.
3. On the Choose E-mail Service screen, select Microsoft Exchange, POP3, IMAP, or HTTP, then click Next.
Enter your Gmail account information here for Outlook 2007.
4. On the Auto Account Setup screen, enter your name (as you want it to appear in the From field of messages) into the Your Name field.
5. Enter your full Gmail email address, which is your username followed by "@gmail.com", in the E-mail Address field.
6. Enter your Gmail password in the Password field.
7. Enter your Gmail password again in the Retype Password field, then click Next.
8. Outlook connects to the Gmail servers, and assuming you entered your account information correctly, after a moment it displays the Congratulations! screen.
9. Click Finish. Your Gmail account is configured.
That's the last step in the procedure to configure Outlook for Gmail. Now you can use the CTRL-1 keyboard shortcut to go to the Mail view.
Next press F9 to send and receive all mail. This downloads messages from Gmail. Seeing them in the Inbox will show that you were able to successfully configure Gmail as an Outlook email account.
Configuring Outlook 2003 or XP for Gmail POP3 Access
If you are not using Outlook 2007, follow these steps to configure Gmail and Outlook account use:
1. In the Outlook main menu, click Tools, then E-mail Accounts. This launches the E-mail Accounts wizard.
2. Select Add a new e-mail account, then click Next.
3. Select POP3, then click Next.
Enter your Gmail account information here for Outlook 2003.
4. Enter your name (as you want it to appear in the From field of messages) into the Your Name field.
5. Enter your full Gmail email address, which is your username followed by "@gmail.com", in the E-mail Address field.
6. Enter your Gmail username in the User Name field.
7. Enter your Gmail password in the Password field.
8. Enter "pop.gmail.com" in the Incoming mail server (POP3) field.
9. Enter "smtp.gmail.com" in the Outgoing mail server (SMTP) field.
10. Click More Settings to open the Internet E-mail Settings dialog box.
11. Click the Outgoing Server tab.
12. Set the My outgoing server requires authentication check box.
13. Select Use same settings as my incoming mail server.
14. Click the Advanced tab.
15. Under Incoming server (POP3), set the This server requires an encrypted connection (SSL) check box.
16. Under Outgoing server (SMTP), set the This server requires an encrypted connection (SSL) check box.
17. Change the number in the Outgoing server (SMTP) field to 465, then click OK.
18. Click Test Account Settings. After a moment you should see a message that says all tests were completed successfully. If not, go back to the start of this procedure and check your work.
19. Once you see the success message, click Next then Finish.
That's the last step in the procedure to configure Outlook for Gmail. Now you can use the CTRL-1 keyboard shortcut to go to the Mail view.
Next press F9 to send and receive all mail. This downloads messages from Gmail. Seeing them in the Inbox will show that you were able to successfully configure Gmail as an Outlook email account.
You can add and display a second time zone in Outlook, which can be useful when you are scheduling meetings or conference calls with people who are working in other time zones.
When you add a second time zone, the current time in the primary time zone is highlighted with a color gradient to make it easier to see.
If two time zones are shown, the meeting organizer's time zone is used as the reference point. If you organize a meeting and display free/busy time for invitees from other time zones, their busy times are adjusted so that they are displayed correctly in your time zone.
The second time zone is visible only when you view the calendar in day or week view.
The start and end times for items in the Outlook Calendar are stored in the Coordinated Universal Time (UTC) format. UTC is the international time standard. It is similar to Greenwich Mean Time (GMT), except that UTC observes no daylight saving time (DST) and is based on a 24-hour clock. Zero (0) hours UTC is midnight GMT. The local 24-hour time convention is converted to UTC by adding or subtracting hours based on location in relation to the prime meridian, as well as local daylight saving time considerations.
If you are in one time zone, and you send a meeting request to an attendee in a different time zone, the meeting item is displayed at the respective local times on each person's calendar, but stored as the same absolute time in UTC.
For example, if a meeting organizer in the Pacific Time zone in the United States sends out a meeting request for a meeting that starts at 2:00 P.M. Pacific Time to an attendee in the Mountain Time zone, the attendee will see the meeting as starting at 3:00 P.M. Mountain Time. In both cases, the meeting is stored on the servers as starting at the same UTC time (10:00 P.M.).
Note: With respect to time zones, appointments, meeting items, and all-day events are all handled in the same way.
Add a second time zone
Outlook can display two separate time zones in the Calendar. The two time zones can be, for example, your local time zone and the time zone of a city that you often travel to. When you are staying in the other city, you might want to view your Calendar items in relation to the time zone for that city. To display a second time zone in your Outlook calendar, select the Show an additional time zone check box in the Time Zone dialog box. The second time zone is used only to show a second time bar in Calendar view, and does not affect the way in which Calendar items are stored or displayed.
1. On the Tools menu, click Options.
2. Click Calendar Options.
3. Click Time Zone.
4. Select the Show an additional time zone check box.
5. In the Label box, type a name for the additional time zone.
6. In the Time zone list, click the time zone that you want to add.
7. If you want your computer clock to automatically adjust for daylight saving time changes, select the Adjust for daylight saving time check box.
This option is available only in time zones that use daylight saving time (DST).
Tip: You can quickly switch from your current time zone to the other time zone by clicking Swap Time Zones. This change affects all time displays in Outlook and in all other Microsoft Windows-based programs.
Remove a time zone
1. On the Tools menu, click Options.
2. Click Calendar Options.
3. Click Time Zone.
4. Clear the Show an additional time zone check box.